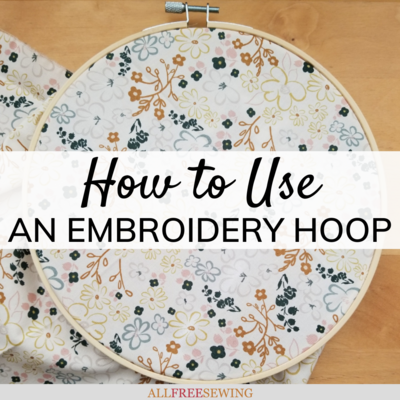
Solved: How to Use an Embroidery Hoop
Learn the basics of embroidery hoops, such as how to put fabric in embroidery hoop, with this tutorial.

If you don't know how to use embroidery hoops, then this is the tutorial for you! Embroidery hoops are primarily used for hand sewing and embroidery but they can also be used as frames for fabric art. They are actually pretty versatile.
Since they usually don't come with instructions, I thought I'd share the ins and outs of How to Use an Embroidery Hoop.
On this page, learn about embroidery ring sizes, types, plus, how to use all kinds of embroidery hoops since each one is slightly different. It's a simple process but there are a few little details that you may miss if you are using your first hoop or a new version.
Plus, because there is more than one type of embroidery hoop, each has its own rules of use and tips for getting it right the first time. Because of this, I'll start by doing a quick overview of each main type or style of embroidery hoop. Then I'll explain how to use them.
After the tutorial, I have a few embroidery hoop projects for you to try and test your new skills with. Check them out and see how easy embroidery hoops make hand sewing or decorating.
Types of Embroidery Hoops and Frames: Overview
You can read more detail and see these types in more detail lower on the page.
The most common:
- Screw top embroidery hoops
- Quilting hoops
- Spring tension embroidery hoops
- Rubber embroidery hoops
Additional unique embroidery frames:
- Oval frames
- Square/rectangle frames
- Octagonal frames
- Triangle frames
- Tiny pendant embroidery hoops and frames (for necklaces)
Embroidery Hoop Sizes: Overview
Because the unique frames vary, let's go over the most common sizes of the traditional circular hoops.
Screw top embroidery hoops and quilting hoops: Sizes range from about 3 to 30 inches, with quilting hoops on bases at the larger end.
Spring tension embroidery hoops: Sizes range from about 3.5 to 10 inches.
Rubber embroidery hoops: Sizes range from about 5 to 8 inches.
Types of Embroidery Hoops and Frames
Screw Top Embroidery Hoops:
This is the most conventional type of embroidery hoop. This type is available in both wood and plastic. It comes with an inner frame that's a full circle in the same material as the outer frame.
Wood screw top embroidery hoops shown below.

The outer frame has a gap at the top and includes a screwing mechanism at the top to tighten. Screwtop hoops are usually only circles and ovals but you may see the occasional rounded corner square or rectangle. Again, the sizes range from about 3 to 30 inches.
Plastic screw top embroidery hoops shown below.

Quilting hoops tend to be larger and you will sometimes find them attached to an adjustable base instead of having to hold the frame in your lap. With such delicate and time-consuming work, hand quilting needs all the help it can get.
All smaller hoops and frames are meant to be held in one hand while you sew with the other.
Spring Tension Embroidery Hoops:
This embroidery hoop has an outer frame of plastic (full unbroken circle with an inner groove for the metal piece) and an inner frame made of metal with gripping handles at the top.
This type of hoop is only available in a circle because of the metal spring inner frame. The sizes range from about 3.5 to 10 inches.
Plastic spring tension embroidery hoops shown below.

Rubber Embroidery Hoops:
This embroidery hoop has a rubber outer frame and plastic inner frame with a groove that the rubber part fits into. Because this type is made of rubber, it is flexible enough to be pulled off and pushed back over the frame without any protruding parts.
Rubber hoops usually have a ring hanger. They are also available in shapes other than circles, ovals, and squares, such as curved octagons and rectangles. The sizes range from about 5 to 8 inches.
Rubber Embroidery Hoops shown below.

How to Put Fabric in an Embroidery Hoop: Overview
Most steps are the same for all types of embroidery hoops and it is explained when not the same.
Here are the basic steps but see the next section for the more detailed explanation of how to prepare for using your embroidery hoop:
1. Prepare your fabric so that it is at least 3 inches larger than your hoop all the way around.
2. Set the inner frame on a flat surface and drape the fabric over it.
3. Loosen the screw top of the outer hoop and push it over the fabric and inner frame. Adjust fabric as needed.
4. Tighten screw top until secure.
5. Sew, cut, or finish the fabric hoop as desired.
6. To undo: loosen the screw top and remove the outer frame. Lift fabric from the inner frame.
How to Put Fabric in an Embroidery Hoop: Picture Tutorial
1. There are two ways to prepare your fabric:
Option 1:
Cut a piece of fabric that is larger than the embroidery hoop by a couple or more inches all the way around. The fabric does not have to be the same shape as the embroidery hoop as it can be cut once it's in.
Option 2:
Alternatively, the easier and more common method is to use an uncut piece of fabric and cut it after it is secured in the embroidery hoop.
2. Set the inner frame on a flat surface and drape the fabric over it. If you are trying to center an image or pattern, you can touch to find the rim of the frame and adjust. You can also adjust slightly after the outer frame is on.
Note: If using a plastic screw top hoop, it may tell you which side of the inner frame should be facing in and out (there is a thin lip that works better on the outside and may say, "This Side Up").

3. This step is slightly different for each type, so I will explain them individually:
Spring Hoop: Hold the outer frame in your non-dominant hand and, with your dominant hand, push together the spring handle mechanism to make the loop smaller.
Carefully push the fabric-covered inner spring hoop into the plastic frame groove, starting at the bottom and moving your hand to push it in around. You can slowly loosen your grip on the handle to make the spring wider to fit better.
Release the handle once the spring is inside the groove completely. You can pull the excess fabric to adjust what is inside the hoop and make it taut as needed.
Rubber Hoop: Bend the rubber as needed to fit into the inner plastic frame's grooves. Once it is completely over the inner frame, you may be able to pull any excess fabric to tighten and adjust but it can be more difficult since the rubber isn't as smooth as with the other two hoop types.
Screw Top Hoop: First, undo the screw top so that it is loose and large enough to be placed over the piece. Slip it over the fabric and inner frame.
Adjust the fabric inside the frame as needed, then start tightening the screw on top until tight. You can do this slowly and adjust the fabric as needed as you go.
Because the screw top is the most common type, the images below show how to assemble it for sewing.


4. You are ready to sew! Use your embroidery hoop to keep your fabric taut while sewing. You can remove the fabric and set it back in the embroidery hoop following the above steps if needed for larger pieces.
Once finished, unscrew/loosen the spring frame/bend the rubber frame off the inner frame, and finish your project as desired.


Keeping the fabric in the embroidery hoop to be used as a frame?
How to finish an embroidery hoop as a frame:
There are several ways to finish an embroidery hoop but our two favorites are using the glue method or the stitching method.
Gluing Method: Trim the excess fabric from the frame. Leave about 1/4 to 1/2 of fabric. Use a glue gun to glue along the back of the inner frame (not inside) and push the excess fabric over all the way around.
Stitching Method: We could explain this but there is a great video tutorial by Craft Habit Raleigh that does such a brilliant job, we think you'll appreciate it more:
How to Use an Embroidery Hoop
As we've mentioned, embroidery hoops can be used for sewing, displays, or art pieces and you can do this in different ways. Our next section has a lot of fun ideas!
When it comes to how to use an embroidery hoop for sewing, the most important thing to understand is that you should do what's most comfortable for you.
There are no set rules for this. Traditionally, the hoop is supposed to be held in your non-dominant hand as you hand sew with your dominant hand.
If balancing the hoop on the arm of a chair helps you hold it in place, do that. If using the quilting hoop base is preferred, you can make it work for smaller projects, too.
If holding it down toward your lap is more helpful for steady sewing, that's great. Just remember that being in an unnatural position at length can be bad for your body.
Embroidery Hoop Art Projects:
Now that you know how to use an embroidery hoop of any kind, you can try using your new skill. Testout working with embroidery hoops by making any of these cool projects.
It's fun to use the embroidery hoop as a frame but you can easily remove your art after sewing and do something else with it, such as making a quilt, pillow, or framing it in a picture frame.
1. Embroidery Hoop Art: If you love to embroider then check out this link for Embroidery Hoop Art. This tutorial is full of great embroidery ideas for every piece you sew.
2. Your Kind of DIY Clock: If you're after cool crafts, check out this trendy and thrifty idea. This home decor piece is Your Kind of DIY Clock. Perfect for any sewing enthusiast or lover of embroidery hoop art.
3. Embroidery Hoop Organizer: Shown below! You can never have too many organizers, especially if you are an avid crafter. This DIY Sewing Organizer is all you need when it comes to organizing your sewing supplies and displaying them with the pride they deserve.

4. Easy Embroidered Christmas Star Ornament: Making DIY Christmas ornaments is a sure-fire way to get in the holiday spirit. This Easy Embroidered Christmas Star Ornament is a quick project that will have you feeling festive in no time.
5. DIY Cross Stitch Travel Map: This is a cute way to mark your travels across the U.S. Use the embroidery hoop as a frame that can easily be removed from the wall when you need to add a new state.
6. Vintage Christmas Wreath Beaded & Embroidered Ornaments: Shown below! This Vintage Christmas Wreath Beaded and Embroidered Ornaments project combines lettering, embroidery, and hand sewing, so it's perfect if you want a nice little thing to work on.

7. Colorful Wall Pocket Organizer: If you're a sewist, you know how messy your workstation can get in the heat of a project. With this Colorful Wall Pocket Organizer, you'll never lose your sewing tools in the mess again. Use unexpected materials like cork and embroidery hoops for this one!
8. Vintage Doily DIY Wall Art: Turn some old thrift store doilies into gorgeous vintage-inspired wall art with this simple craft tutorial. This Vintage Doily DIY Wall Art is the perfect combination of classy and crafty!
9. Mini Bicycle Embroidery Hoop Necklace: Shown below! This is from our sister site
AllFreeJewelryMaking. Featuring a beautiful design with a classic style, this pendant will be a unique necklace that you'll treasure for years to come. It's also a creative way for you to combine your passions for embroidery and making jewelry.

10. Mini Hoop Fabric Necklace: This Mini Hoop Fabric Necklace is no-sew and gives you the variety you need with an adorable look. This necklace requires very little of whatever fabric you want so if you have some scraps from a project you loved you can make a necklace out of it!
BONUS! Our friends over at FaveCrafts also have a great collection with 16 Amazing Embroidery Hoop Crafts.

Want More?
7 Essential Tools Needed for Embroidery >>
What is your favorite type of embroidery hoop?
Let us know in the comments below!
Read NextWhat is a Serger?