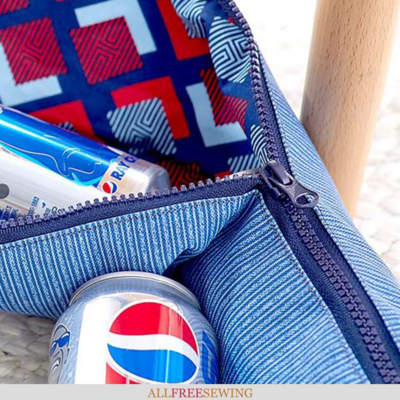
DIY 6 Can Cooler Sleeve
Making your own can cooler sling is a game-changer! It holds and insulates six canned beverages in a handy bag anyone can carry easily.

You've had two lives. The first is before you saw this pattern and the second is after seeing this DIY 6 Can Cooler Sleeve. This travel project takes your standard cooler to the next level.
You may have seen a similar beer sleeve cooler on the popular invention show Shark Tank but with this version from Coats & Clark at Yarnspirations, you can make and customize your own at home! Why buy when you can DIY?
If you're heading out for a few hours or longer, you can now easily carry six standard cans of soft drinks, beer, water, or anything else you want to drink while you're out and about. With the insulated fleece lining, you don't have to worry about the drinks getting warm any time soon.
The streamlined design is also a game-changer because it's long and narrow instead of wide and bulky. It also has a handy webbing strap with a slide buckle. Most adults will have no trouble toting this can cooler sling around.
That's not all! Yarnspirations notes this cool feature, too: "Since the zipper opens at both ends, it’s easily accessible for two different types of drinks, so add a pal’s favorite to one end and yours on the other." Any day you have this sleeve cooler with you is going to be even better.
Join Sewing It Up For More Free Patterns, Tutorials, & Guides >>
DIY 6 Can Cooler Sleeve
Skill Level: Intermediate
Project Type: Make a Project
Time to Complete: In an Evening
Sewn By: Both Hand and Machine
Materials List:
• Coats & Clark Dual Duty XP® Outdoor Thread
• 26" (66.04cm) Coats® Parka Zipper
• 1/2-yd (45.72cm) outdoor fabric
• 1/2-yd (45.72cm) cotton lining fabric
• 1/2-yd (45.72cm) insulated fleece
• 1-1/2-yd (1.37m) 1" (2.54cm) webbing
• One 1" (2.54cm) D-ring
• One 1" (2.54cm) slide buckle
• Zipper foot
• Can Circle Template (page 3 of PDF)
• Standard sewing notions
Notes:
• The finished size is 28-1/2" x 3-1/4" (73.29cm x 8.89cm).
• All seam allowances are 1/4" (.64cm).
Tips for Using Coats Outdoor Thread:
• Use a size 16 or 18 (100 or 110) needle. A topstitching needle, which has a larger eye, is also recommended.
• Use a longer stitch length, 6-8 stitches per inch, or 4 mm. A thick thread needs more space to form a stitch.
• Increase top tension.
• Sew slowly. The thread is thick and less flexible than all-purpose thread. Stitch quality will be better if you slow down.

6 Can Cooler Sleeve Instructions:
Cutting:
From the outdoor fabric, cut:
(1) strip, 29" x 10-1/2" (73.66cm x 26.67cm), for bag body.
(2) circles, 3-3/4" (9.56cm) diameter, for bag ends, template available on page 3 of the PDF.
(2) rectangles, 1-3/4" x 3-1/4" (4.45cm x 8.26cm), for zipper tabs.
(1) square, 2" (5.08cm), for D-ring tab.
From cotton lining, cut:
(1) strip, 29" x 10-1/2" (73.66cm x 26.67cm).
(2) circles, 3-3/4" (9.56cm) diameter.
(2) rectangles, 2" x 4-1/2" (5.08cm x 11.43cm).
From insulated fleece, cut:
(1) strip, 29" x 10-1/2" (73.66cm x 26.67cm).
(2) circles, 3-3/4" (9.56cm) diameter.
Assembling the Body
- Press under 1/4" (.64cm) on the long edges of the body rectangle. Mark the center on both the edges.
Note: Some outdoor fabrics are made of polypropylene and you will need a press cloth to avoid melting the fabric. Test on a scrap.
- Press under 1/4" on one short edge of the zipper tab. Mark the center of the zipper tape length.
- Center the folded edge of a zipper tab across each end of the zipper, just beyond the stop. Sew across the entire width at the upper zipper end.
On the lower zipper end, stitch part way, but skip the area with the hard plastic stop, then begin sewing again on the other side of the stop. Measuring from the center, trim the zipper length to 29" (73.66cm).
- Matching centers, pin the long folded edge of the bag body to the zipper about 1/4" (.64cm) away from the teeth. Use a zipper foot and a right needle position if your machine has it, then edgestitch in place.
- For the opposite side, unzip the zipper almost all the way, and repeat Step 4.
Assembling the Ring Tab and Strap
- Fold opposite edges of the D-ring tab to the center and press. Edgestitch each fold.
- Thread the tab through the D-ring and baste the raw tab edges together.
- Matching raw edges, center the D-ring tab over one end of the zipper; baste.
- On the opposite end, baste the webbing end in place, centering it over the zipper and matching raw edges. Curl up the webbing and pin to avoid catching it in subsequent stitching.
Assembling the Bag Ends
- Fold each circle in half and pin mark the center points. Beginning at the center of the zipper opening, pin-mark the bag's top and bottom halves.
- With right sides together and matching centers, pin each end circle to the bag body, easing fabric around the curves. Stitch in place with the bag body side up.
Assembling the Lining
- Baste the corresponding lining section to each fleece section 1/8" (.32cm) from the raw edge.
- Press under 1/4" (.64cm) along both long edges of the lining rectangle.
- Pin the end circle to the lining rectangle and stitch as above.
Note: There will be a gap between the pressed-under edges at the upper circle midpoint.
- Press the small lining rectangles in half to make 2" x 2-1/4" (5.08cm x 5.72cm) rectangles. Position the raw edge of the rectangle in the gap, matching the end circle raw edges; stitch.
- With wrong sides together, insert the lining into the outer bag body, aligning the gap with the zipper. Pin in place and adjust as needed.
- Hand-stitch the lining to the zipper tape edges and across both ends. Turn the bag right side out.
Finishing the DIY 6 Can Cooler Sleeve
- Thread the webbing end through the slider, through the D-ring, and back through the slider. Try on the tote and trim the webbing length if needed.
- Finish the raw end of the webbing by turning it under twice and stitching across the width.
- Fill with cans of your favorite beverages end to end and zip for carrying safely.


Want More?
15+ Bowl Cozy Patterns & DIY Bowl Covers >>
Where do you plan to take your new cooler?
Let us know in the comments!
Read NextReusable Sandwich Bags