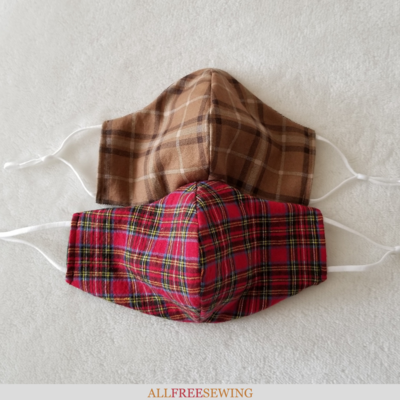
Flannel Fabric Face Mask Tutorial
Stay warm with a winter face mask. This reversible face mask is thick and warm, perfect for staying outside!

When COVID became bad enough for mask mandates and concern, the weather was already warming up in most places. Most masks focused on providing the most protection using the lightest fabrics.
Once cold weather hit again, most masks did not provide the warmth needed to stay outside. Also, cold weather of winter heightens the chances of being sick.
Family and friends asked if I could create a warmer mask for winter. I took up the challenge and used one of my favorite fabrics, flannel, to create the softest and warmest masks yet.
This Flannel Fabric Face Mask is brilliant for many different reasons. Plus, it can be made into a festive Christmas wearable or kept "evergreen" for any colder months.
It comes with printable templates for adults and children (though you can use any template you'd like). If you're used to covering your face with scarves or other fabric coverings, then you'll love wearing this warm DIY mask.
We're even making this mask reversible so you can have options throughout the winter. We have several tips and suggestions before the tutorial below, so be sure to read about that below.
One of the things discussed is to make the mask even warmer, you can use multiple layers or add a warmer, thicker fabric to the side that touches your face. Or mix and max flannel and regular cotton fabrics. Plus, other warm fabrics can be substituted.
Note: Please read about COVID-19 and the latest guidelines from the CDC here.
Let's get started!

Best Winter Mask Fabric
So, why flannel? Flannel is a soft woven fabric that is popular and easy to find. Plus, it's often 100% cotton, which is perfect for DIY face masks. Keep in mind that flannel can also be synthetic, which isn't ideal for masks. When shopping for mask fabric, always go for natural fibers because those are breathable but durable.
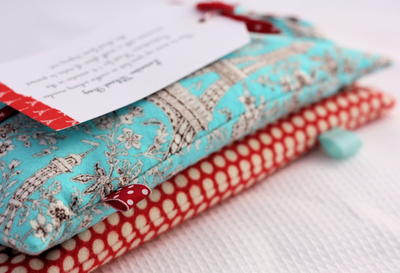
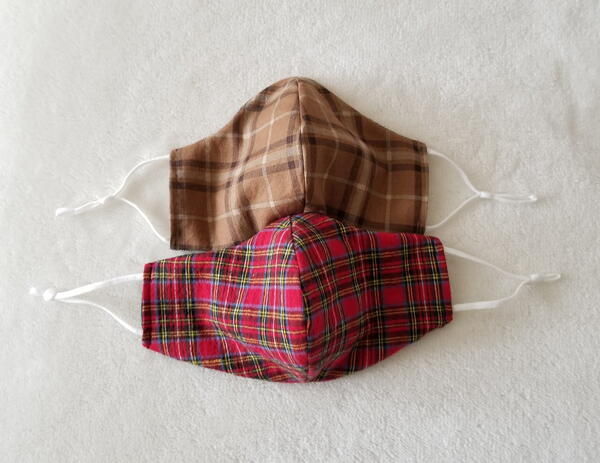
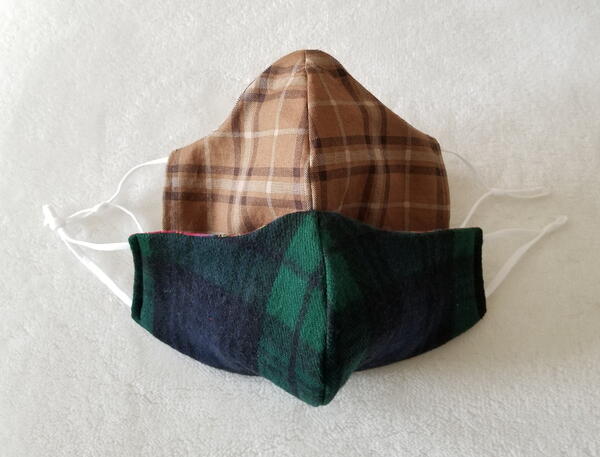
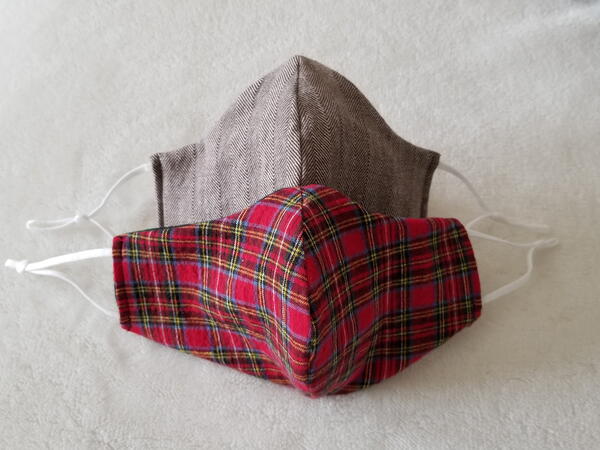
Flannel is also available in different thicknesses and patterns. The image below shows the four fabrics used for these reversible winter masks:
- A red plaid flannel that's soft and thicker than standard cotton but not by much.
- A navy/green flannel that's soft and thick.
- A brown plaid flannel that's soft and thicker than standard cotton but not by much.
- A brown striped flannel that's soft and stretchy, plus slightly thicker than standard cotton.

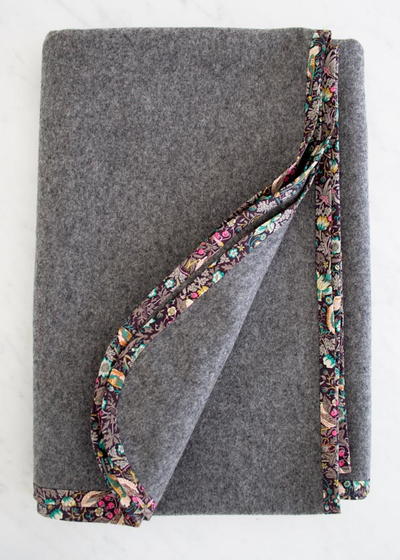
Because the navy/green flannel is so thick, it's best to use only one layer and then another layer of a thinner fabric. However, it's all about your comfort level.
Like with crochet face masks, it's a fine line between comfort and discomfort. You want to stay warm but also need to be able to breathe with your face covering. It might be worth testing the different thicknesses before making too many. Read the following guides to learn more:
My sister's favorite flannel masks are the ones I made using one thick cotton flannel layer and a thinner tight-woven cotton fabric layer on the other. She says they are super comfortable but also cute (always a plus!). Two examples are shown below.

How to Make a Mask Reversible
Something I love doing with my masks is making them reversible. It's actually super easy to do, even if you use a nose wire. The key is folding the side edge pieces inside and putting the elastic or earloops inside, then sewing over (rather than folding over to the "back" of the mask). See Step 9 below for the visuals and instructions on exactly how to do it.
Related FAQ: Where can I find the attachment to make the string on the mask adjust to fit your face? Many people who make masks use elastic, which can be purchased at any craft store or craft retailer online and cut to fit. However, elastic will eventually stretch and the mask might not fit as tightly.
That's why I recommend adjustable earloops, which I purchased through Amazon. These earloops are soft, stretchy, but also have a plastic piece that allows you to shorten or loosen your mask for the best fit.

Note: It's important to remember that just because a mask is reversible doesn't mean you should flip it during the same wear. To prevent the spread of germs, COVID, and the flu, a mask should be worn one way, washed and dried, and then can be worn on the reverse side.
Face Mask Materials Needed:
- 100% cotton flannel (4 template-sized pieces for a two-layer mask, 6 pieces for a three-layer mask)
- Scissors (and rotary cutter/self-healing mat if desired)
- Sewing machine
- Matching or complementary thread (spool and bobbin for machine)
- Iron and ironing board
- Fabric pins or clips
- Elastic or adjustable earloop bands
- Face mask template (available in different styles and adult/child sizes) or face mask template of choice
- Filter liner - learn about filters here (optional)
- Nose wire (optional)
How to Make a Cold Weather Flannel Mask:
Skill Level: Easy
Approximate Time to Complete: About 1 hour
- Print the mask template PDF (or preferred template) in the style and size desired. Cut out the mask template.
Note: Read through the tips and details on the template page before printing.
- Using the template of choice, cut out two pieces of flannel for one side of the mask. Cut two more pieces of flannel (or different fabric) for the other side of the mask.
If you would like the mask to have three layers, cut another two pieces (this set of fabric will not show).
Note: If the print/pattern is directional or has lines, make sure you are placing the template at the correct angle.

- Place two cut fabric mask pieces right sides together (if applicable) and pin or clip. Sew along the curved edge with a 1/4" to 3/8" seam allowance. Lock the stitches at the start and end.


Cut excess thread and clip the curves along the sewn edge. Be careful not to cut the seams. Repeat for all pairs.

- Open the sewn mask piece and press the seams to one side for all pieces.

- Add a filter pocket or nose wire (optional). Put the sewn mask pieces right sides together and pin or clip to secure, making sure that the middle seams are aligned. Sew along the top and bottom to attach (again with a 1/4" to 3/8" seam allowance). Lock stitches at the start and end.

- Cut excess thread and clip curves along the sewn edges. Again, do not clip through the seams.

- Turn out the DIY flannel mask so that the right sides are out. Be sure to push out along the sewn edges to push the fabric out all the way (since flannel is thicker).

- Press both sides of the mask to flatten seams and remove wrinkles. Pay extra attention to the edges.

- To make the mask reversible, push in the raw edges on both sides about 1/2-inch. Press if needed to keep in place. See the image below for how it should look.

- Cut elastic if needed (should be about 7" for adults and 5" for children) or grab your earloops. Carefully place the elastic/earloops inside the mask, leaving at least 1/2" inside the mask to be sewn and attached. Pin or clip if desired.

- Sew on elastic/earloops. Lock stitches at the beginning and end where going over the elastic/earloops.


You are done!


Want More?
10 DIY Hand Warmers >>>
Do you prefer summer or winter?
Let us know in the comment section!
Read NextCozy DIY Snuggie Tutorial