What Causes Puckering When Sewing?
Fabric puckering is problematic. Learn how to determine when fabric is puckering and how to prevent it when sewing.

Fabric puckering is a sewing nuisance most sewists have run into at one time or another, and there's nothing more frustrating than seeing your hard work ripple at the seams.
You may shake your fist at the sky and wonder why your beautiful sewing project deserved such a ragged-edged fate.
You followed all the steps, sewed each edge as carefully as possible, and you still can't make your seams lay flat.
Well, your frustration ends here, because this guide will show you exactly what causes puckering when sewing and give you a few simple suggestions on how to prevent puckering.
If you're wondering what is puckered fabric, then check out the first section below to learn the details of what this means.
Whether your bottom material puckers when sewing or you're seeing puckering elsewhere, there are solutions.
Your sewing projects will never look cleaner than after reading this life-saving article!
Sign Up For More Free Patterns
What Causes Puckering When Sewing?
Table of Contents

What is Puckering?
First thing's first: whether you're an advanced sewist or a beginner, you may be wondering, "What is puckering, anyway?"
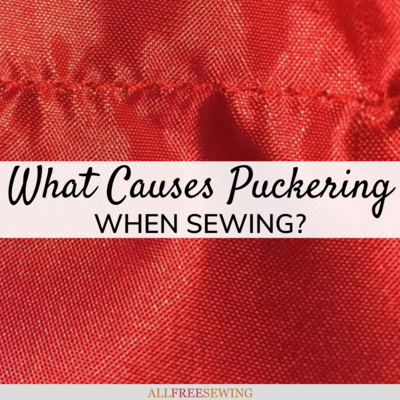
Seam pucker is when fabric appears rippled after sewing, creating an uneven texture along the sewn line. Puckering most often occurs on fine, delicate fabrics and fabrics that are very tightly woven.
There are several different causes of puckering, though they all yield similarly uneven edges. Don't despair! There are many ways to reduce or wholly prevent puckering in your sewing once you identify the cause.
What Causes Puckering When Sewing? + How to Prevent It
According to thread producer Amann USA's pamphlet, Prevention of Seam Pucker, there are several causes of (and solutions for!) puckering fabric.
Each cause corresponds with a personally tailored solution that will transform your uneven seams into clean, flat, and professional-looking lines.
Read each of these explanations to catch your own puckering culprit in no time.
Excess thread tension is one main cause of seam puckering, and it often occurs when your sewing machine's thread tension is set too high.
This can be easily solved by…
- Resetting your sewing machine’s tension to a low setting. Information on how to do this can be found in your sewing machine's manual.
- Gently stretching the fabric with your hands as you sew, both in front of and behind the needle. By preventing the fabric from being pulled into unsightly bunches, this extra stretch will counteract puckering.
Be careful not to bend the sewing needle if you attempt this solution, and don’t try to push or pull the fabric underneath the needle. This might make the puckering worse.

Feed pucker occurs when two fabrics are sewn together, and the uneven pressure exerted on the two fabrics causes one of them to pucker.
This occurs because only the bottom fabric, or the fabric touching the presser foot, is being stretched while the top fabric receives minimal force.
To fix this type of pucker…
- Try adjusting the fabric pressing force to the lowest setting.
- Reduce the pressure of the presser foot so that it doesn’t exert uneven pressure on the pieces of fabric.
- Stretch the fabrics as you sew so that both layers receive equal force, just like if the puckering has been caused by excess thread tension.

Displacement pucker occurs when two fabrics are sewn together, and they both pucker at the seams, often in a symmetrical pattern.
Unlike other types of puckering, this one happens due to the type of the fabric itself.
When a fabric’s threads are woven too tightly, then the individual warp/weft threads are displaced by the intrusion of the needle and sewing threads.
It is no surprise, then, that tightly-woven fabrics, like canvas, are most prone to this type of puckering.
To solve this type of puckering…
- Use the finest needle and thread possible for your fabric.
- Sew in double chain stitches when joining seams because the thread loops on the underside of the material. This will reduce unwanted tension.
Dull needles may cause puckering because they must press into, and therefore stretch out, the fabric before penetrating it.
To fix this issue, replace your needle when it is no longer sharp enough to easily penetrate your fabric.

If you choose the wrong thickness of thread for your fabric, your sewing project may become puckered. Always look to see which threads are recommended for your fabric.
When in doubt, pick the thickness of the thread that’s closest in diameter to the threads that make the fabric.

Want More?
How to End a Sewing Stitch >>
What other sewing-related questions do you have?
Let us know in the comments!