How to Grade a Pattern: 3 Simple Grading Methods
Learn everything about grading sewing patterns, and you'll never be constrained by pattern size ever again!

We’ve all been there: you find a clothing pattern you fall head over heels for. It has the ideal hang, style, and silhouette—everything you’ve been scouring clothing racks for since your last inspiration haul from Vogue.
The only catch? It isn’t your size.
Whether it’s too small or too big, the pattern may make you want to throw up your hands in frustration. After all, you were so close to finding your dream pattern and now it seems like everything is ruined.
Or is it? Not when you have our guide, How to Grade a Pattern: 3 Simple Grading Methods, available.
Just because your dream pattern is a size or two too large or small doesn’t mean it won’t fit you. You don’t need to pack up your sewing machine over a small sizing concern. Instead, you have the power of pattern grading at your fingertips!
When someone says they need to "grade a pattern," you may think that they’re giving their newest sewing find an A+. However, what they’re really doing is increasing or decreasing a sewing pattern so that it's the right size and maintains its proportions.
What a hot sewing tip! That way, they get the exact same shape of the pattern in a larger or smaller size. That's why it's important for a sewist to know how to grade patterns.
Grading sewing patterns may seem like utter wizardry or—even more complicated—a lot of difficult math, but you don’t have to fear it anymore. Here at AllFreeSewing, we’ve compiled a master tutorial for easy pattern grading that will have you achieve a perfect handmade fit every pattern you sew!
Below, you’ll find everything from necessary grading terminology to three easy methods to grading your sewing pattern: slash and spread, cut and overlap, and measure and mark. Using these comprehensive how to grade a pattern instructions, you’ll be able to increase or decrease the size of your patterns like a pro.
Sign Up For More Free Patterns >>>
What is the difference between an even and uneven grade?
Even grade: An even grade means that the central measurements of a pattern—the bust, waist, and hip, for example—change the same amount between consecutive sizes at any given point. Therefore, if the difference between size 6 and size 8 patterns is 2’’ at one point, an evenly graded pattern would have a 2’’ difference between size 8 and size 10 patterns at the same point.
Also, a pattern is an even grade if the difference in the pattern between consecutive sizes changes by the same measurement at different measurement points. If the waist measurement increases by 2'' for each consecutive size and the hip increases by 2'' for each consecutive size, then it is an even grade.
Uneven grade: If the differences between size patterns are not even between consecutive sizes at the same point, then you have an uneven grade. Therefore, if the difference in bust between a size 8 and a size 10 is 2’’ and the difference between a size 10 and a size 12 is 4’’, the pattern has an uneven grade.
A pattern also has an uneven grade if the difference in the pattern between consecutive sizes differs at different measurement points. If the bust measurement increases by 3’’ for each consecutive size and the waist increases by 2’’ for each consecutive size, then it is an uneven grade.

Pattern Grading Glossary
When it comes to grading patterns, there are a few terms you need to know.
Grading: the process of proportionally increasing or decreasing a pattern to change its size without changing its shape.
Grade: the measurement between pattern sizes.
Cardinal points/corner points: the points on a pattern where the grade often changes. These often include a pattern’s neckline, shoulder, the lower part of the armhole, the middle of the armhole, waist, and hip.
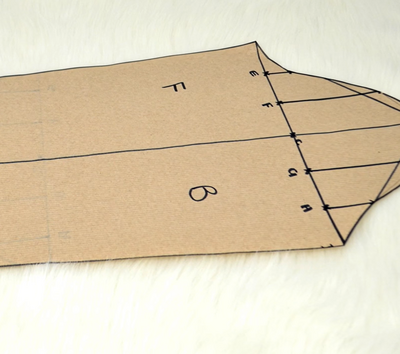
Method 1 - Slash and Spread
This is one of the most popular methods of increasing a pattern’s size. It uses the original pattern, cuts it into several larger portions, and then increases the space between these portions so that the overall pattern size increases. You will need extra pattern paper, scissors, tape, and a pencil/marker for this method.
- Measure your body to determine how many sizes up you need to go to get your ideal fit. To do this, take a tape measurer around relevant areas, including the bust, waist, and hip.
Note: It is recommended that you increase a pattern by only a few sizes at a time to maintain the best accuracy. Therefore, to jump from a size 2 to a size 10, it would be best to move from a size 2 to a size 6 first and then from a size 6 to a size 10.
- Take the pattern and draw vertical and horizontal lines connected at the pattern’s cardinal points/corner points. Draw vertical lines at the pattern’s neckline, shoulder, and lower part of the armhole. Draw horizontal lines at the middle of the pattern’s armhole, the pattern’s waist, and its hip.
- Cut along the vertical lines you have drawn so that you are left with several vertical strips of the pattern.
- Determine how much your pattern size needs to increase (e.g. An extra 4’’ would be necessary to make a 34’’ bust pattern to fit a 38’’ bust). This measurement will need to be evenly distributed across the pattern through the spaces between the strips you cut. Divide this measurement by 4 (see note below) and then divide the resultant number by the number of strips you have cut minus one. This final number is the amount of space you will add between each of the vertical strips you cut in Step 3.
Note: Oftentimes, you will be working with half of a pattern, meaning you will only be working with half of the front or back of the pattern. Therefore, you will often only work with 1/4 of the overall pattern at a time. To accommodate this, you will only increase each quarter of the pattern by 1/4 the overall amount. For example, if you need to increase your bust by 4’’, then you should increase the first half of the front pattern by 1’’. If you have cut four strips, then you should add 1/3" between each strip.
- Tape the top of the strips to a new piece of paper so that there is the necessary distance between them (i.e. the measurement you found in Step 4).
- Next, cut your pattern along the horizontal lines you drew in Step 3.
- As a general rule, patterns usually increase 3/8’’ in length per size. Divide 3/8 by the number of horizontal strips you have minus 1. Then, add that amount of space between each of the horizontal pieces you cut and tape them in place on the same piece of paper.
For example, if you are going from a size 8 to a size 10 and you cut 4 horizontal pieces, then you should place 1/8" between each of these pieces for a total of 3/8’’ length increase.
- As smoothly as possible, draw along the new perimeter of your pattern, trying to make the spaces between the cut portions as smooth as possible.
- Cut along this newly drawn perimeter, through the paper to which you taped your cut portions.
- Trace this new pattern onto a fresh piece of pattern paper. This paper will serve as your new pattern.
Method 2 - Cut and Overlap
This system of making a smaller pattern uses the same slash-and-spread method, except inverted. While the slash-and-spread method increases the distance between certain portions of the pattern, this method overlaps these portions to decrease the pattern’s overall size. You will need extra pattern paper, scissors, tape, and a pencil/marker for this method.
- Measure your body to determine how many sizes down you need to go to get your ideal fit. To do this, take a tape measurer around relevant areas, including the bust, waist, and hip.
Note: It is recommended that you decrease a pattern by only a few sizes at a time to maintain the best accuracy. Therefore, to jump from a size 10 to a size 2, it would be best to move from a size 10 to a size 6 first and then from a size 6 to a size 2.
- Take the pattern and draw vertical and horizontal lines connected at the pattern’s cardinal points/corner points. Draw vertical lines at the pattern’s neckline, shoulder, and lower part of the armhole. Draw horizontal lines at the middle of the pattern’s armhole, the pattern’s waist, and its hip.
- Determine how much your pattern size needs to decrease (e.g. A 4’’ decrease would be necessary to make a 34’’ bust pattern to fit a 30’’ bust). This measurement will need to be evenly eliminated across the pattern by overlapping the strips you cut. Divide this measurement by 4 (see note below) and then divide the resultant number by the number of strips you have cut minus one. To the left of each of the vertical lines you have drawn, draw another vertical line that is this distance from the original.
Note: Oftentimes, you will be working with half of a pattern, meaning you will only be working with half of the front or back of the pattern. Therefore, you will often only work with 1/4 of the overall pattern at a time. To accommodate this, you will only decrease each quarter of the pattern by 1/4 the overall amount. For example, if you need to decrease your bust by 4’’, then you should decrease the first half of the front pattern by 1’’. If you have cut four strips, then you should eliminate 1/3’’ from between each strip.
- Cut along the original vertical lines and the new vertical lines you drew in Step 3. This will eliminate the desired amount of space across the width of the pattern. Discard these thin strips and tape the newly decreased vertical strips so that they touch one another on a new piece of paper.
- As a general rule, patterns usually decrease 3/8’’ in length per size. Divide 3/8 by the number of horizontal strips you have minus 1. Then, below each of the horizontal lines you have drawn, draw another horizontal line that is this distance from the original.
For example, if you are going from a size 4 to a size 2 and you cut 4 horizontal pieces, then you should draw a line 1/3’’ (3/4 divided by 3) below each of the original horizontal lines for a total of 3/8’’ length decrease.
- Cut along the original horizontal lines and the new horizontal lines you drew in Step 5. This will eliminate the desired amount of space across the length of the pattern. Discard these thin strips and tape the newly decreased horizontal strips so that they touch one another on the new piece of paper.
- As smoothly as possible, draw along the new perimeter of your pattern, trying to smooth out the jagged lines between the cut portions.
- Cut along this newly drawn perimeter, through the paper to which you taped your cut portions.
- Trace this new pattern onto a fresh piece of pattern paper. This paper will serve as your new pattern.

Method 3 - Measure and Mark
It is important to note that not all parts of the body increase or decrease at the same rate when weight is added or removed. For example, a waist may increase two inches for each size increase. However, other measurements used to complete the pattern, like the bust, may increase one inch per size.
Therefore, you may notice that pattern measurements don’t always increase or decrease by the same amount for each part of the body. This system of pattern grading is best to accommodate these non-uniform changes because it measures differences between sizes across the entire pattern rather than just using a few baseline body measurements.
- Measure your body to determine how many sizes up or down you need to go to get your ideal fit. To do this, take a tape measurer around relevant areas, including the bust, waist, and hip.
Note: It is recommended that you increase or decrease a pattern by only a few sizes at a time to maintain the best accuracy. Therefore, to jump from a size 2 to a size 10, it would be best to move from a size 2 to a size 6 first and then from a size 6 to a size 10.
- On the pattern, draw a straight line through each cardinal point/corner that is perpendicular to the pattern lines. These lines should extend past the drawn pattern lines in either direction.
- Measure the distance between each of the size lines on the pattern along the newly drawn line. Then, on the line you just drew, make a mark where your graded-up or graded-down pattern line would occur based on how much distance would occur based on previous distances.
For example, if there are 2 inches separating each size at one point of the pattern, and the largest size is size 10, to make a size 14, you would mark 4 inches beyond the size 10 pattern line.
- Repeat Step 3 by drawing lines along the curves between each of the cardinal points/corners that are perpendicular to the pattern. Make as many points as necessary to replicate a smooth curve by connecting the dots.
- Connect all of the dots along your graded pattern, mimicking the shape of the original pattern as closely as possible.
- Repeat Steps 2-5 for all remaining pieces of the pattern until you have a fully drawn pattern in the correct size.
Want More?
How to Make a Sewing Pattern >>>
What's your favorite type of project to sew?
Let us know in the comments!
Your Recently Viewed Projects
Thanks for your comment. Don't forget to share!
KLC
Nov 22, 2019
This is so helpful! Especially when there are three different methods to do it. Makes it much more manageable.
Report Inappropriate Comment
Are you sure you would like to report this comment? It will be flagged for our moderators to take action.
Thank you for taking the time to improve the content on our site.