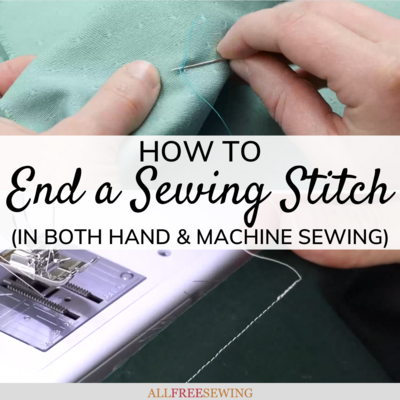
How to End a Sewing Stitch
Learn how to finish a stitch by hand or by machine with this beginner-friendly guide.

Wondering how to finish a sewing stitch?
If you hand or machine sew or want to start, one of the most important things you can learn is how to finish your sewing stitches. With this guide, How to End a Sewing Stitch, you will learn this and so much more!
This page starts off with helpful resources for both hand sewing and machine sewing. If you're a beginner, don't scroll past those because they'll help you with every aspect of sewing you need to know.
If you want to jump to the tutorials or elsewhere on the page, visit the Table of Contents and click on what you're interested in learning about.
There is a video and written tutorial for hand sewing and then for machine sewing. This means that whether you're a visual learner or prefer step-by-step written tutorials, you are covered.
You also won't want to miss the FAQs we've provided that help you understand locking your stitches, parts of your machine, and other common queries. If you have more questions, leave a comment at the bottom of our page and we'll do our best to answer!
Sign Up For More Free Resources and Patterns
A little about the author: My name is Krista and I've been sewing for as long as I can remember. I grew up in a crafty family and decided to start fixing my clothing and adding buttons myself at an early age. I started designing and sewing toys that I would give my friends and experimenting with all sorts of techniques. I'm more comfortable with hand sewing and it helps me relax but I love the speed of machine sewing, too!
Table of Contents for How to End a Sewing Stitch
First: Beginner Sewing Resources
If you're a beginner, then be sure to read these helpful pages. These resources will help you grasp basic techniques, speed up your processes, and get you on the right track to becoming a can-do-all sewist.
- How to Use Liquid Stitch Adhesive
- How to Start for Sewing Beginners
- How to Use a Needle Threader
- How to Use a Seam Ripper
- Sewing Tools and Equipment
- How to Use a Sewing Thimble
- Hand Sewing Needle Sizes/Types
- What Types of Thread to Use
- How Much Thread Do I Need?
- Does Sewing Thread Get Old?

Plus: Helpful Stitch Resources
Once you learn about sewing tools and the basics of materials, then it's time to move on to the specifics of sewing. This set of guides and tutorials will walk you through the steps you need to fully understand how to end a sewing stitch.
- How to Thread a Hand Sewing Needle
- How to Tie a Hand Sewing Knot
- How to Start a Hand Stitch for Sewing
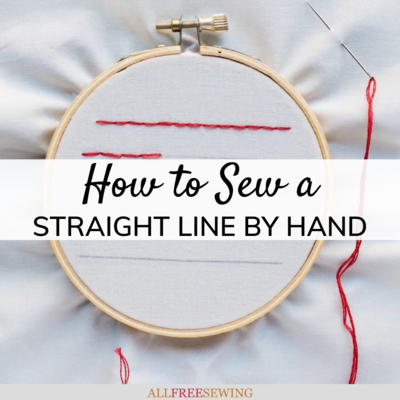
- How to Sew a Straight Line by Hand
- How to Sew with a Sewing Machine
- How to Sew Straight Lines by Machine
- Learn the Types of Embroidery Stitches
- How to Remove Stitch Marks From Fabric

What is Backstitching in Sewing? & Other FAQs
What is backstitching in sewing?
While it means an outline of thread in embroidery, when sewing (particularly on a machine), it means reversing the direction of sewing. Instead of going forward, the needle and thread moves backward.
What is a lock stitch on a sewing machine?
This is a button on a sewing machine that reverses the direction of sewing.
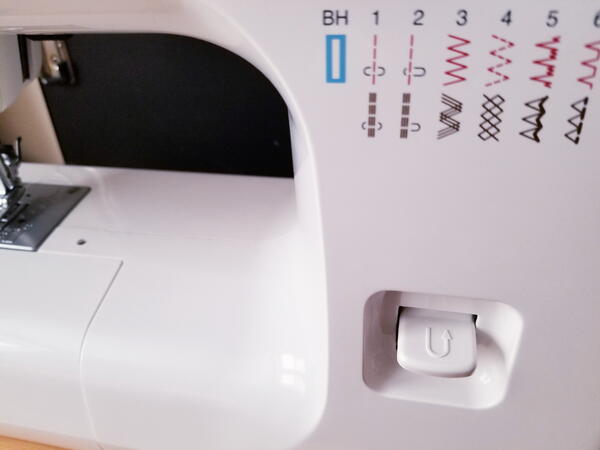
Where is the reverse button on a sewing machine?
This button is often found on the front of the machine (as is shown in the image below) but it can also be found above the needle on certain machines. Look for a u-turn arrow icon on the button.
How do you start and end a stitch on a sewing machine?
You both start and end a stitch on a sewing machine using the same method, which is by manually using the reverse button (how to is detailed in the tutorials lower on this page). Some more modern machines have a built-in automatic lock stitch. Read your manual to find out which your machine has.
Do you need to lock the start of a stitch?
Yes, you always need to lock your stitch at the beginning of sewing and at the end.
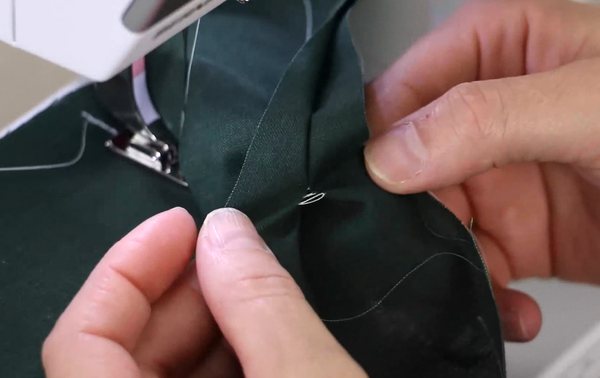
Why do you need to lock a stitch or seam when sewing?
If a stitch is not locked, it will start coming apart (as is shown in the image below). Depending on use and wear, this can ruin your finished product quickly or over time, making it unusable. When locked, it will keep unless damaged.
How do you tie the end of a thread?
Using more thread than you need is always recommended for finishing. Leaving a tail at the beginning and end of tyour hread piece is the best way to be successful when ending a stitch. You can tie it with your hands or with a needle. Check out the tutorials below for the specifics.
How do you close the last stitch?
By hand or machine locking to secure. This involves wrapping spare thread around the thread used in your stitching. After it is knotted, you simply need to snip the excess. Again, check out the tutorials below for the specifics.
What do you do with thread after sewing?
You will cut the leftover threads from your finished piece. This provides a clean and professional look. Secure the thread on your spool by fitting the end into the slit on the plastic top. If your spool doesn't have one, you can use tape.
Which end of the thread do you knot?
The end you cut is the end you will knot. Read our guide, How to Tie a Sewing Knot to learn more.
How to End a Stitch When Sewing by Hand Video Tutorial
This video tutorial is a snippet from our How to Sew a One Hole Button page. Although it's used for a button, the ending is the same as you'll do when ending most hand stitches. Take a look at the video by pressing the play button. Then scroll to the next section for the written tutorial and alternative techniques.
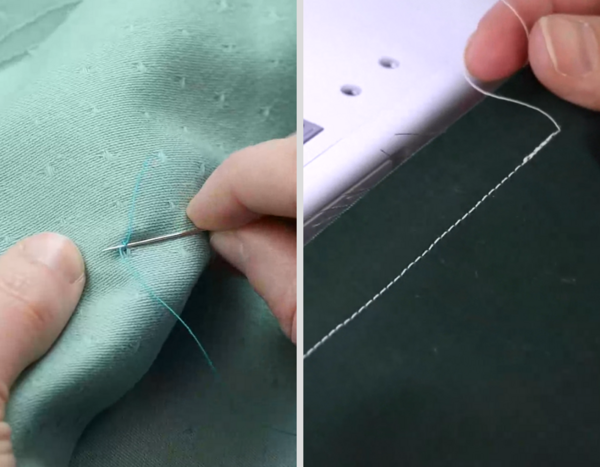
How to End a Stitch When Sewing by Hand
Everyone who sews by hand has their own way of ending a stitch, but there is a general consensus that you will leave extra thread, knot it, and cut the thread. If you need to learn how to start, read through How to Start a Hand Stitch. Here are a few options once you're ready to finish:
- Use the leftover thread (the tail) to tie a knot. Hold each string in each hand and knot as close to the fabric as possible without pulling. Do this two to four times and cut the excess thread.
- Use your threaded needle to weave into the existing threading lines you've created on the back of the fabric. This technique is shown in the video above:
- Push the needle under one of the stitches and pull through while still leaving a loop.
- Pass the threaded needle through the loop and lightly tighten it.
- Make a second finishing knot using the same method you just used to secure. You can do this once more or stop here.
- Cut the excess thread at the base of the knot but be careful not to cut into the knot (or any of your stitches).
- Push the needle under one of the stitches and pull through while still leaving a loop.
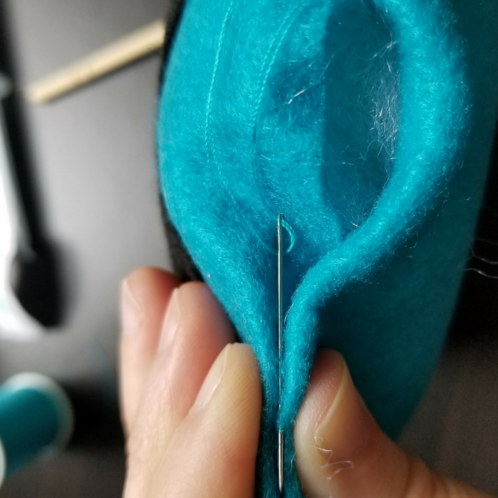
How to End Your Hand Sewing Using an Invisible Stitch:
You can use an invisible/ladder stitch to end a sewing stitch that does not show. To do this:
- Thread your needle and knot (if you are sealing an existing hole that was left open. Otherwise, continue with your already threaded needle).
- Slightly fold over the felt edges and secure the thread at the end of the opening near the last seam you did by hiding it in that inside fold.
- Sew by moving the needle and thread through the inside of the folds, holding on to keep it from unfolding.
- Finish by weaving the needle into the existing threading on the inside of the fabric.
- Knot, again inside the opening so that it doesn't show.
- Cut the excess thread.
How to End a Stitch on a Sewing Machine Video Tutorial
This video tutorial is a snippet from our How to Sew a Straight Line With a Sewing Machine page. While certain sewing machines automatically lock the stitch at the start and end, most have a manual reverse stitching button. Take a look at the video by pressing the play button. Then scroll to the next section for the written tutorial.
How to End a Stitch on a Sewing Machine
To end a stitch on a machine manually, you will need to locate the reverse stitch button (also known as a back-stitch button). It's often on the front or face of the machine to the right of the arm. However, it is sometimes above the needle. If you still don't see it, look for a button with a curved arrow, as shown in the image below.
An important note before getting started is that you need to keep the button held down as you stitch in reverse. Luckily, you only need to lock a few stitches, which takes mere seconds. The machine does the rest of the work by pulling the fabric forward or back.
In most cases, you will need to do this at the start AND end of a stitch, but the tutorial is the same for both. Here's how you start and end your stitch on a machine:
- At the start of your stitch, start sewing and let the machine feed dogs pull the fabric forward around three to five stitches. Stop sewing but don't move the fabric.
- Hold down the reverse stitch button and start sewing again so that the fabric moves backward around three to five stitches. Stop sewing but don't move the fabric.
- Let go of the button and start sewing regularly again around three to five stitches.
Your starting stitch is locked and you can continue your sewing.
- Once you are at the end of a fabric side, part, or project, repeat Steps 1-3 to lock the stitching at the end.

Want More?
How to Sharpen Sewing Scissors >>
What other sewing 101 techniques would you like to learn?
Let us know in the comments!
Read NextSimple Quilted Coaster Tutorial